This chapter contains the following topics:
Introduction to Purchase Orders
Use this selection to enter purchase orders. Then you can print them on plain paper or on preprinted Purchase Order forms. After printing, you can post the new purchase orders to the permanent Purchase Order data.
The appearance of some of the screens in this chapter depends on the options that you previously selected in Control information. The screens you see in the main body of this chapter are those you would see if you have interfaced the Inventory Control (I/C) module to Purchase Order and have not interfaced Purchase Order to Job Cost.
If you are not interfaced to I/C, and/or you are interfaced to J/C, these cases are described at the end of the chapter.
Unposted purchase orders may be changed by this selection, but once they have been posted a separate function is needed to change them. A subsequent chapter, Changes to Purchase Orders, describes this procedure.
Posted purchase orders remain until closed, as described in the Close and Purge Purchase Orders chapter.
A purchase order consists of two parts:
which contains information such as the vendor address, where to ship the items ordered, etc.
The lines (line items) section
which contains information for each line item such as the item number, how many ordered, etc.
Select
Enter from the Purchase orders menu.
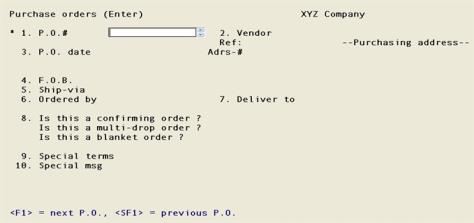
After you select Enter, this screen displays:
The default P.O. number format is AAANN
This is the screen for the purchase order header section. The screens for purchase order line items will appear after the header information is entered in this screen.
From this screen you can work with both new and existing purchase orders.
You can make changes to a purchase order here until it is posted. The only way to change it after that is through the Changes to P.O.’s selection. Refer to the Changes to Purchase Orders chapter.
1. P.O. #
This number is used to identify this purchase order throughout this module.
For a new purchase order
While entering Control information, you answered the question Use alphanumeric purchase order #’s ?. Your answer to this question affects the entry of purchase order numbers.
Alphanumeric purchase order numbers
Purchase order numbers do not need to be issued, and may be entered in any format or sequence.
We recommend that you always use P.O. numbers that match the format entered for Default P.O. # format in Control information. This will make it much easier for you to keep track of your P.O. numbers throughout the P.O. entry, printing and posting functions.
Options
Press <F2> for the next available purchase order number as described above.
The next available P.O. number is calculated for you. The numeric portion of the last P.O. number entered is increased by an increment of 1. This is done as long as the last P.O. number matches the Default P.O.# format entered in Control information. For instance, if the last P.O. number entered was 1001-AB (matching a format 9999AAA), the next P.O. number would be 10002-AB.
If the last P.O. number entered does not match the default P.O. number format, there is no option for the next available P.O. number. Instead, the default P.O. number is shown at the bottom of the screen with the message The default P.O. number format is NNNNAAA.
Numeric purchase order numbers
If you are using numeric purchase order numbers, purchase order numbers must be issued through the Issue P.O.#’s function. If you try to enter a purchase order number greater than the last purchase order number issued, you are informed that you must use Issue P.O.#’s to issue additional purchase order numbers.
Leading zeroes are not required for numeric purchase order numbers.
The next available purchase order number is obtained from the Next purchase order# field in Control information, where it may be changed if necessary.
Enter the number of the purchase order.
Options
You may also press <F2> for the next available purchase order number, as described above.
|
Format |
15 characters, numeric or alphabetic as described above |
|
Example |
Press <F2> |
Whether you use numeric or alphanumeric numbers, you can enter a number other than the next calculated number, so long as it has not already been used for another purchase order and (if numeric) has been issued. When you do, this new number does not become the basis for calculating the default on the next purchase order.
For an existing purchase order
Enter the number of the unposted purchase order you wish to change, examine, or delete.
Options
You may also use one of the options:
|
<F1> |
For the next unposted purchase order, in purchase order number sequence |
|
<SF1> |
For the previous unposted purchase order |
Upon selection of a valid existing entry, it will appear and be available for changes or deletion; the cursor will be positioned at Field number to change ?.
2. Vendor
Enter the number of the vendor from whom you are ordering.
Options
You may also use one of the options:
|
F1> |
For the next vendor (including miscellaneous vendors), in vendor number sequence |
|
<SF1> |
For the previous vendor |
|
<F2> |
To void this purchase order number. Refer to Voiding below. |
|
<F6> |
For the same vendor number as that of the last purchase order you entered in this session |
|
Blank |
To look up the vendor by name (described below) |
|
<Format |
Six characters |
|
Example |
Upon selection of a valid vendor, its name displays to the right of the number. You will be warned if a vendor is flagged (in A/P Vendors) as no purchases.
Looking up the vendor by name
The cursor will move to the vendor name field, allowing entry of a name (or just its leading characters). Upper/lower case is significant.
Options
Enter a name, or use one of the options:
|
<F1> |
For the next vendor, in vendor name sequence |
|
<SF1> |
For the previous vendor name |
|
Blank |
To go back to looking up the vendor by number |
|
Format |
25 characters |
|
Example |
Does not occur in this example because you have selected a vendor from the number field. |
Voiding
If you use numeric purchase order numbers, this feature ensures that each purchase order number issued is accounted for.
For instance, a pre-numbered form might accidentally be damaged beyond use. The <F2> option provides a means of identifying these cases. This is called voiding.
When you use this option, you will be asked to confirm the void. If you do, the remainder of the screen is not entered and the cursor does not move to Field number to change ?. Instead you are positioned at Field #1 for the next purchase order.
Voiding a purchase order number does not prevent you from using that number on a new purchase order later on.
Temporary vendors
You can enter a temporary vendor number by starting the vendor number with an asterisk (*). It is not necessary for the temporary vendor to have been previously entered in A/P Vendors.
Adrs-#
This field is required unless this is a temporary vendor, in which case the cursor does not move to it.
Adrs-# corresponds to Location-# in Purchasing addresses. Refer to the Purchasing Addresses chapter. Vendors with more than one remittance address (e.g., branch locations or satellite warehouses) should have a separate location number for each address. Vendors with only one address do not required any location code.
Options
Enter the Purchasing Address Location-#, or use one of the options:
|
<F1> |
For the next purchasing address for this vendor |
|
<SF1> |
For the previous purchasing address for this vendor |
|
<F2> |
For the vendor’s remittance name and address (from A/P Vendors) |
|
Format |
Five characters |
|
Example |
Press <F2> |
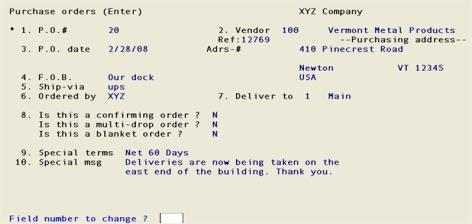
3. P.O. date
Enter the date of this purchase order. The date of the previously-entered purchase order displays as the default, and may be ratified by pressing <Enter> For the very first purchase order of a session, the default is the system date.
|
Format |
MMDDYY |
|
Example |
Type: 030197 |
4. F.O.B.
5. Ship-via, and
6. Ordered by
All three of these fields are optional and may be left blank.
Enter the F.O.B. location.
Enter the name of the carrier who will ship the items from the vendor to you.
Enter the person, group, or office that initiated the purchase order.
In each case you may press <F2> for the default value for that field provided that you have actually supplied such a default in Control information.
|
Format |
15 characters (in each case) |
|
Example |
Press <F2> at each field |
7. Deliver to
Enter the location code for the location to which the items are to be delivered
You may also use one of the options:
|
<Enter> |
For the Central deliver-to location (if one is defined) |
|
<F2> |
To deliver to an address not present in the Deliver-to locations selection |
For multi-drop orders
Multi-drop purchases by definition are delivered to more than one location. Even if you plan to specify (in Field #8 below) that this is a multi-drop order, you must still enter an actual location code here. This will be used as the default for each line item. If you press <F1> here for a multi-drop order, when you reach Field number to change ? you will have to change either the location or the multi-drop status.
|
Format |
Two characters |
|
Example |
Type:1 |
Delivery address
These fields display automatically except when you have pressed <Enter> in the preceding.
Even if you have done so, these fields are optional and may be left blank. For instance, if the purchase order is for services rather than for goods, delivery location may be a meaningless concept.
Enter the name and address to which the shipment is to be delivered:
|
Format |
30 characters |
|
|
|
30 characters |
|
|
|
30 characters |
(address line 2) |
|
|
30 characters |
(address line 3) |
|
|
3 characters |
|
|
Example |
Does not occur in this example because this purchase is to be delivered to a standard address. |
8. Is this a confirming order ?
Your response to this question determines whether the purchase order must be printed before it can be posted, and if so what the printed copy will be used for.
Enter one of the following:
|
Y |
Yes, this is a confirming order. |
|
|
A confirming order is a printed purchase order sent to a vendor as a follow-up to a verbal order (made over the phone or in person). It confirms a verbal order. |
|
|
At the top of each page of the purchase order, the following will be printed: This is a confirmation of a verbal order. Do not duplicate this order. |
|
N |
No, this is not a confirming purchase order. |
|
|
This is the normal case, used when you place your orders with a vendor by means of the printed purchase order rather than verbally. |
|
I |
For Internal use only. |
|
|
At the top of each page of the purchase order, the following will be printed: This order is printed for internal use only. Do not mail to vendor. |
|
D |
Don't print. |
|
|
This purchase order will not be printed in the normal course of printing new purchase orders, using the Purchase orders (Print) selection. |
|
Format |
One character from the list above. The default is the Dflt confirming order flag from Control information. |
|
Example |
Press <Enter> for the default. |
Is this a multi-drop order?
If you have chosen (in Control information) to use multi-drop orders, you will be asked whether this is a multi-drop order.
Answer Y if this is a multi-drop order. A multi-drop order is one that has items to be delivered to more than one location.
If you answer Y here but in field #7 you have entered a deliver-to location that exists, you will get a message at Field number to change ? telling you to re-specify the deliver-to location.
|
Format |
One letter, either Y or N. The default is N. |
|
Example |
Press <Enter> |
This field cannot be changed on an existing purchase order.
Is this a blanket order?
If you have chosen (in Control information) to use blanket purchase orders, you will be asked if this is a blanket order.
Answer Y if this is a blanket order. A blanket order is one expected to be delivered in stages over an extended period of time, and must be released each time. Refer to the Releases chapter for details.
|
Format |
One letter, either Y or N. The default is N. |
|
Example |
Press <Enter> |
This field cannot be changed on an existing purchase order.
9. Special terms
Enter any special credit or payment terms for this purchase order.
This field is optional and may be left blank, in which case:
| • | If this is a regular vendor, the standard terms from A/P Vendors will be shown on the printed purchase order. |
| • | If this is a temporary vendor, the terms field will be left blank. |
|
Format |
30 characters |
|
Example |
Type: Net 60 Days |
10. Special msg
Enter the number of a message that you entered in the P.O. Messages selection or press <Enter> to enter up to four lines of text. This message will appear at the bottom of the printed purchase order.
|
Format |
Four lines of 50 characters each |
|
Example |
Type: Deliveries are now being taken on the Type: east end of the building. Thank you. |
Field number to change ?
The screen now looks like this:
Make any desired changes.
Options
For an existing purchase order, you may also use one of the options:
|
<F1> |
For the next purchase order. |
|
<SF1> |
For the previous purchase order. |
|
<F3> |
To delete this purchase order. |
Deleting Purchase Orders
Deleting a purchase order does not automatically void that number.
Field number to change ?
When you press <Enter> from Field number to change ?:
| • | If this is a new purchase order, the line-item screen will appear. |
| • | If this is an existing purchase order, you are asked Do you wish to change the lines ?. Respond Y to proceed to the line-item screen, or N to enter another purchase order. |
This section assumes that I/C is interfaced. Is not, then see If you are not using Inventory Control.
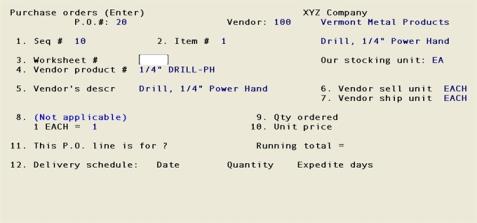
This is the purchase order line screen.:

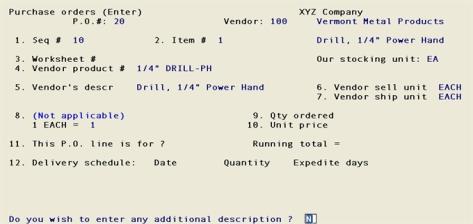
Enter information about the items you are ordering. There is one line for each item being ordered.
1. Seq #
The sequence number is a temporary number identifying each line and its sequence in the purchase order. The sequence numbers do not have to be consecutive numbers and are usually assigned to lines in increments of 10 (e.g., 10, 20, 30).
If you want to add a line between two other lines before posting the purchase order, give the new line a sequence number between the two. For example, to insert a line between 10 and 20, you could give it a sequence number of 15. When you post the purchase order, the sequence numbers will be replaced by consecutive line numbers. In this example, the sequence numbers 10, 15, and 20 would become line numbers 1, 2, and 3 after posting.
Enter a sequence number.
Options
You may use one of the options:
|
<F1> |
For the next line item of this purchase order |
|
<SF1> |
For the previous line item |
|
<F2> |
To assign a new line item in increments of 10 (for example, 10, 20,30). |
|
<Esc> |
To indicate that you have finished entering line items for this purchase order. |
|
Format |
9999 |
|
Example |
Press <F2> |
2. Item #
If not interfaced to I/C, items are identified by the vendor product number; so this field does not appear, and the remaining fields on the screen are renumbered accordingly.
Enter the item number of the item ordered.
Options
You may use one of the options:
|
<F1> |
For the next vendor item |
|
<SF1> |
For the previous vendor item |
|
<F2> |
For a non-inventory item (described below) |
|
<F3> |
To change entry mode |
|
<F5> |
To look up by keyword |
If you are using I/C, if P/O Control information has field 22. Show all item desc ? set to Y and your item record has more than 3 lines, then a window like the following will display:
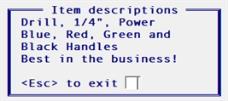
This window displays 3 or 4 lines of description from the item record.
Inventory items
If this is an inventory item, it must previously have been entered for this vendor in Vendor items. If not, you must interrupt this purchase order to do so, then return to this selection.
Except for multi-drop orders, the software does not verify that this item is actually stocked at the specified deliver-to location until the purchase order is posted.
Once the item ordered has been received and posted (via Receivings), a transaction will be automatically post through I/C Inventory to update your inventory.
Upon entry or selection of a valid inventory item, its description and stocking unit appear on the screen. Lines 3 and 4 of the item description, normally reserved for internal warehouse control uses, do not appear.
Non-inventory items
Use <F2> to enter a non-inventory item. Only do this for items that will not be part of your I/C inventory (for instance, services, supplies, or capital items). Inventory transactions will not be created for non-inventory items.
When <F2> is pressed, **Misc** displays for this field, Non-inventory item is displayed for the description, and entry continues at Vendor product # (Field #4).
This use of the term **Misc** should be distinguished from the miscellaneous items which occur in I/C. It is not necessary that the item being ordered correspond to any miscellaneous item that exists within I/C. In fact, you cannot enter an item number beginning with an asterisk, either in this selection or in Vendor items.
On reports which summarize information by item number, all non-inventory items are considered to be the same item, since they all have the same item number **Misc**.
It is assumed that temporary vendors sell only non-inventory items. If the vendor number begins with an asterisk, the item is automatically assumed to be a non-inventory item, so the cursor does not even move to Field #2.
|
Format |
15 characters |
|
Example |
Type:1 |
After you enter the item number, information about that item is displayed automatically. The screen looks like this:
This screen assumes that you are interfaced to I/C and that this is neither a multi-drop shipment nor a blanket order.
3. Worksheet #
You can skip this field if you wish. The worksheet number is used only for your reference, to relate items being ordered to worksheets which you have printed.
If this item is on a worksheet you printed through the Purchasing worksheet function, enter the number of the worksheet. If you're ordering a non-inventory item, (Not applicable) displays here.
|
Format |
9999 |
|
Example |
Press <Enter> to skip this field. |
4. Vendor product #
If I/C is interfaced and you have entered an inventory item for Item #, the number from Vendor Items displays automatically and this field is skipped.
If you're ordering a non-inventory item, enter the number the vendor gives to the item you are ordering.
|
Format |
15 characters |
|
Example |
In this example the field displays automatically because this is an inventory item. |
5. Vendor’s descr
This description will appear on the printed purchase order.
If I/C is interfaced and you have entered an inventory item for Item #, the vendor’s description from Vendor items displays automatically.
If you are ordering a non-inventory item, you may enter the vendor’s description of the item. If you do, this description will appear on the printed purchase order.
|
Format |
Up to two lines of 25 characters each. |
|
Example |
In this example the field displays automatically because this is an inventory item. |
Do you wish to enter any additional description ?
You are asked whether you wish to enter any additional description.
|
Format |
One letter, either Y or N |
|
Example |
Type:N to omit additional description. |
You can insert a blank line by pressing <Enter> at the beginning of the line.
Enter the desired text, or press <F2> to terminate the text. The contents of the current line are not preserved when you do this, so press <Enter> first.
|
Format |
Up to six lines of 25 characters each |
|
Example |
This screen does not appear because not requested in this example. |
6. Vendor sell unit and
7. Vendor ship unit
If this is an inventory item, these units of measure display automatically and may not be changed.
Otherwise, the fields are required. Enter the units the vendor uses for selling and for shipping this item, or press <F2> for Each.
|
Format |
Four characters in each case |
|
Example |
In this example the fields display automatically because this is an inventory item. |
8. Conversion factors
For an inventory item, two conversion factors display automatically and may not be changed:
| • | The conversion factor between the vendor’s selling unit and the vendor’s shipping unit. |
| • | The conversion factor between your stocking unit and the vendor’s shipping unit. |
For a non-inventory item, only the first conversion factor is applicable and that is all that appears. If Fields #6 and 7 contain the same unit, (Not applicable) displays here and may not be changed. If they are different, enter the conversion factor between the vendor’s selling unit and the vendor’s shipping unit.
Press <F2> to interchange the units. For example, this lets you express 1 OZ = 0.06333 LB as 1 LB = 16 OZ.
|
Format |
9999.99999 (not to exceed 2,000) |
|
Example |
In this example the field displays automatically because this is an inventory item. |
9. Qty ordered
Enter the quantity of this item that you wish to order. You can order as many as 99999999 units or as few as .0001 units.
For an inventory item, the quantity must be expressed in terms of your stocking unit; for a non-inventory item, of the vendor’s selling unit. On the printed purchase order, the quantity will automatically be converted into the vendor’s selling unit.
If the item is serialized, a fractional quantity will not be accepted.
If the vendor requires a certain minimum order, and your order is less than the minimum, you see Vendor’s minimum order is ____ units, where units is the vendor’s selling unit. This is only a warning.
On an existing order, if you change the quantity you will be required to change the delivery schedule and the distribution (account or job, as applicable).
|
Format |
99999999.99999 (if this line is for Inventory or Other) |
|
|
99999999.9 (if this line is for Jobs) |
|
Example |
Type:12 |
10. Unit price
Enter the price per the vendor’s selling unit. If you are ordering an inventory item, enter the item price.
The extended price will be calculated and displayed.
|
Format |
9999999.99999 |
|
Example |
Type:22.50 |
When you select enter on Unit price, the Extended price and the Running total fields display a value.
Extended price
This is not an editable field. It displays the total dollar amount for this line being entered. It is the quantity ordered times the Unit price.
Running total
This is not an editable field. It displays the total dollar amount of the lines being entered. It is the addition of the extended price amounts for each line.
11. This P.O. line is for ?
A line item can be for one of three uses:
|
I |
Inventory Only available when you are interfaced to I/C and this is an inventory item and the deliver-to location in the header was not manually entered. When an I item is received, your inventory is automatically updated. |
|
J |
Jobs Only available if you are using J/C. For J items you will later in this screen be asked to specify which job[s] the item ordered will be used for. This information will be used in J/C for automatic costing of the job. If you are interfaced to I/C as well as to J/C, a J item may or may not be an inventory item. Even if it is, your inventory will not be updated upon receipt. |
|
O |
Other If you are interfaced to I/C, O items include expense items such as office supplies, capital items such as computer equipment, and services. You may enter O for an item whether or not it is an inventory item; but even if it is, your inventory will not be updated upon receipt. |
If you are interfaced to neither I/C nor J/C, this field displays as (Not applicable) and may not be changed.
The entire quantity on a line item must be for the same use. If you want to split a quantity between two or more uses, enter two or more lines for the same item.
|
Format |
One letter from the list above |
|
Example |
Type:I |
Upon entry of a valid letter, you choice will be spelled out in full.
12. Delivery schedule
Not a blanket P.O.
If this is not a blanket P.O., enter the delivery schedule for this item, up to four different deliveries. For a multi-drop P.O., each of these deliveries can be to a different location. You can also specify that one or more of these deliveries is to be expedited. (Deliveries that are expedited appear on the Expedite Shipment Report at the appropriate time.)
Entering each delivery in the schedule has four parts if it is a multi-drop order, or three parts if is not a multi-drop order.
Not a multi-drop P.O.
Enter the delivery date or use the option:
Delivery date
Delivery dates must be entered from the earliest to the latest, and none of them may be earlier than the date of the purchase order.
Enter the delivery date, or press <F2> for the delivery date based on the number Lead Days set in Vendor items.
|
Format |
MMDDYY |
|
Example |
Press <F2> |
Quantity
Quantity cannot be negative and cannot exceed the quantity remaining. If the item is serialized, the quantity cannot be fractional.
Enter the quantity to be delivered on that date or press <F2> for the full remaining quantity outstanding.
|
Format |
99999999.99999 (if this line is for Inventory or Other) |
|
|
99999999.9 (if this line is for Jobs) |
|
Example |
Press <F2> |
Expedite days
You can specify that any particular delivery is to be expedited. Expedited deliveries appear on the Expedite Shipment Report at the appropriate time.
| • | For each delivery, you can enter any quantity not exceeding the amount remaining to deliver. |
| • | As soon as the quantity remaining drops to zero, you exit out of the procedure automatically without pressing <Esc> |
| • | If you are on the last available row, whatever quantity remains is automatically assigned to the last delivery. |
This field is optional, but using it alerts you when an important delivery is about to come due. You can then contact the vendor to verify it is on the way. Note that the word expedite is used here not in the usual sense of making something happen faster, but rather in the sense of identifying which future events you should be monitoring.
The Expedite Shipment Report, described in the Reports chapter, can be printed at any time. It lists all deliveries scheduled within the period of time you specify here.
|
Format |
99 |
|
Example |
Type:5 |
Drop shipments
If you are also using the Order Entry module and you have specified that an item on a customer order is to be drop-shipped, handle this as follows:
|
1. |
For the deliver-to location on the header screen, press <F1>, then type in the customer’s full name and address. |
|
2. |
Answer O (other) to the question This purchase order line is for ? on the line item screen. |
|
3. |
Distribute the line item to the drop ship clearing account that you specified in O/E Control information. |
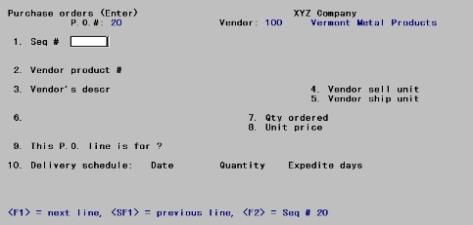
Blanket P.O.
If this is a blanket purchase order, the delivery schedule is entered as the First required date (subsequent delivery dates are controlled by the Releases selection). The screen appears as follows:
![]()
Enter fields #12 through # 15.
12. First reqd date
Enter the date you want the first portion of the blanket order to be shipped. Release #1 of the blanket order will automatically be entered and posted when this purchase order is posted.
The field may be left blank, in which case it will display as NOT SCHEDULED YET. No release will be created, and you will not be able to enter receivings against this purchase order until you have entered and posted Release #1 as described in the Releases chapter.
|
Format |
MMDDYY or blank |
|
Example |
No example is given because this is not a blanket purchase order |
13. First ship qty
Enter the quantity of this item to be delivered in the first shipment. This quantity may not be negative, may not exceed the total quantity, and, when the item is serialized, may not be fractional. It may be less than the vendor’s minimum order quantity.
You may enter zero in this field if you haven’t yet decided on the first quantity to be delivered. Doing this does not prevent automatic creation of Release #1, but you should change that release (via Releases) when you know the quantity.
|
Format |
99999999.99999 (if this line is for Inventory or Other) |
|
|
99999999.9 (if this line is for Jobs) |
|
Example |
No example is given because this is not a blanket purchase order |
14. Expedite days
If you wish the first delivery for the blanket order to be expedited, enter the number of days before the first delivery date that you want this item to appear on the Expedite Shipment Report.
|
Format |
99 |
|
Example |
No example is given because this is not a blanket purchase order |
For the second and subsequent releases, Expedite days can be set in the Releases selection.
15. Release interval
Enter the periodic interval that you want shipments to be made to you. (These periodic shipments are usually called releases.) Enter the release interval in two parts: a number followed by the letter D for days, W for weeks, or M for months. For example, if you want to receive shipments every two weeks, Type:2, then Type:W.
You are given the opportunity to alter this field each time you enter a new release.
You can skip this field if you haven’t decided on a release interval yet, or if there is no regular release schedule for this item.
|
Format |
99 (for the interval) |
|
D, W, or M (for days, weeks, or months) |
|
|
Example |
No example is given because this is not a blanket purchase order. |
Field number to change ?
Make any desired changes.
Options
You may also use one of the following options:
|
<F3> |
To delete this line-item |
|
<F2> |
To enter line item notes as described in the next section |
Make any desired changes, press F2 to enter line item notes or press <Enter> to enter G/L account distributions.
|
Example |
Press <F2> |
A line item can have up to 99 notes. Each note can have 10 lines of 40 characters. These notes will be printed on the purchase order below the line item. Line item notes are especially useful for communicating special instructions to the vendor about a particular line item; they can also be used to supplement the Additional description if needed.
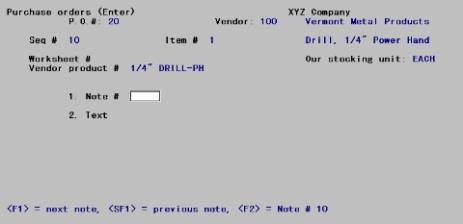
1. Note #
A note number identifies each line item note. The notes for a line item are printed in sequence according to their note numbers.
Enter a note number.
You may also use one of the options:
|
<F1> |
For the next note for this purchase order line |
|
<SF1> |
For the previous note |
|
<F2> |
To insert a new note after all existing notes |
|
<Esc> |
To return to the line item screen |
|
Format |
999 |
|
Example |
Press <F2> for 10 |
2. Text
Enter the notes. To finish entering a line, press <Enter> To finish entering the note, press <Enter> to go to a blank line, then press <F2>
Pressing <Enter> on the tenth line of text will also complete entry of the note.
|
Format |
Up to ten lines of 40 characters each |
|
Example |
Type: Press <Enter> for the next line. Press <F2> to terminate the note. |
Field number to change ?
Make any desired changes or for an existing note, press <F3> to delete this note.
Upon pressing <Enter> with this field blank, the new or changed note will be filed and you will be able to enter another one. Press <Esc> to return to the line item screen and proceed to distributions.
You are asked to specify how this line item is to be distributed to General Ledger accounts.
Your General Ledger is not updated directly by the Purchase Order module. The distributions you enter here are made available to you in A/P when you enter the payable (invoice) for the purchase order. Specifically, when you enter the vendor’s invoice for a purchase order using A/P Payables (Enter), you will be given the option of transferring these distributions to the invoice.
This feature is useful if you have two different staff members entering your purchase orders and your A/P payables. It provides a way for the purchasing staff member to communicate the line item distributions to the A/P staff member without bypassing the A/P staff member’s control over payables entry: The purchasing staff member knows what each item is being purchased for, and therefore should know their proper distribution. But the staff member entering A/P payables should be in control of the distributions used for each payable. Therefore, whether or not the distributions from a purchase order are transferred and used is up to the staff member entering A/P payables.
Acct-#
Enter the G/L account number for the distribution. The account number must already exist in Valid G/L accounts. If this purchase order line is for an non-inventory item (an item that will not be sold, but used internally), enter the G/L account number for the appropriate expense account.
If this line item is for an Inventory item and you are using Inventory Control, enter the G/L account number for your unmatched receivings account.
If you are not using Inventory Control, what you enter here for inventory items depends on whether you are using a perpetual or periodic method of inventory control. Consult your accountant to determine the proper distribution for your inventory method.
Options
Enter an account number, or use one of the options:
|
<F1> |
For the next existing distribution entry (only if this is an existing line item) |
|
<F2> |
For this vendor’s expense account. |
|
<Esc> |
To exit the distribution process |
Quantity/Percent/Amount
You can distribute the line by quantity, by percent, or by dollar amount. Initially you are asked for quantity; pressing <F2> changes quantity to percent, then to dollar amount, then back to quantity. This option is only available on the first distribution for the item, and whatever method is chosen here must be used for all the remaining distributions for this line item.
| • | If you enter by quantity, the total quantity for all distributions must equal the item quantity |
| • | If you enter by percent, the total of all distributions must equal 100%. The amount corresponding to each percent is internally calculated; any roundoff amount is assigned to the last distribution entered. |
| • | If you enter by amount, the total amount for all distributions must equal the item extended cost. |
Enter a quantity, amount, or percent; or use one of the options:
You can press F1 to default to the quantity, percent or dollar amount remaining to distribute.
|
Example |
Press <F1> |
Any change ?
After each distribution is entered, you are asked Any change ?. If you answer Y, you can change the quantity/amount/percent. If you enter a value of zero, the distribution is deleted.
You cannot directly change the account number of an existing distribution. However you can delete it by entering zero, then re-enter that distribution as a separate entry under a different account number.
If Inventory Control is not interfaced to P/O, some screen fields are different from those described previously. Before proceeding with this section, become familiar with the previous section then read this section, which explains the differences when Inventory Control is not interfaced.
The differences are exclusively in the line item screen. There is no difference in the header screen.
Line Item Screen
The item number and the worksheet number do not appear on this screen. The remaining fields on the screen have the same appearance, except that they are renumbered. Some fields, described below, are handled differently as follows:
2. Vendor product number
After entering the sequence number for the line, enter the vendor product number for the item that you are ordering.
If this is an item that you regularly order or one that you stock in your inventory, it should have been previously entered in Vendor Items. Then the product’s description, vendor sell unit, vendor ship unit, and conversion factor will display automatically, thus making line entry faster and more accurate. Your purchase order reports will also be more useful because the items that you order will be identified in a consistent manner.
Enter the vendor product number, or use press <F1> for the next Vendor items entry for this vendor.
|
Format |
15 characters |
|
Example |
No example is given because you are using Inventory Control. |
3. Vendor’s description
If the vendor product number you just entered is not found in Vendor items, you are asked to enter the vendor’s description of the item.
|
Format |
Up to two lines of 25 characters each |
After entering this, you are asked if you want to enter any additional description. If you answer Y, the lower part of the screen clears for you to do this.
|
Format |
Up to six lines of 25 characters each |
4. Vendor sell unit
Enter the vendor’s selling unit of measure for the item you are ordering.
|
Format |
Four characters |
|
Example |
No example is given because your are using Inventory Control. |
5. Vendor ship unit
Enter the vendor’s shipping unit of measure or press <F1> to use the same unit as the selling unit just entered.
|
Format |
Four characters |
|
Example |
No example is given because you are using Inventory Control. |
6. Conversion factor
Enter the conversion factor between the vendor’s selling unit and the vendor’s shipping unit. If these two units are the same, you aren’t asked to enter anything, and (Not applicable) displays.
|
Format |
9999.99999 |
|
Example |
No example is given because you are using Inventory Control. |
The remaining fields are the same whether you use Inventory Control or not (although they are numbered differently).
If Job Cost is interfaced, some fields are different from those described above.
Before proceeding with this section, become familiar with the details in the Entering purchase orders section.
This section only describes the fields that are different when Job Cost is used.
The header screen is the same whether or not you use J/C, and so is the line item screen with the exception of the distribution process.
A job distribution is entered instead of an account distribution, not in addition to it. The method of entry is much the same.
Job distribution makes the account number distribution available to the A/P Payables selection.
In addition, once those payables have been posted the costing information is made available to Job Cost.
| • | Use the J/C Get cost selection for this purpose. |
| • | To examine these before they are transferred (from A/P to J/C), use the J/C Payables by job number selection. Answer Y to the question, Show only entries not yet interfaced to jobs ?. |
Unless this is a blanket order, you can enter more than one distribution entries. They need not all be for the same job.
Each distribution occupies a single row; as you enter each one, the rows already entered scroll downwards. There is room for three rows at a time.
As soon as you have entered one distribution, you are positioned to enter the next -even if the quantity remaining is zero. To exit the process, you must press <Esc> at this point.
You may not enter a negative distribution.
Job number
Enter the job number for the distribution. The job must already exist, and it cannot be a closed or copy-only job. It is not necessary that the job have been activated.
|
Format |
Seven characters |
|
Example |
No example is given because you are not using Job Cost. |
Upon selection of a valid job, its title and status display at the bottom of the screen.
Cost item
The cost item must already have been defined for the job, and must be a direct cost. A labor cost item is allowed (for services-only purchase orders), but you will be asked to confirm this before proceeding.
Enter the number of the cost item in segments.
Options
You may also use one of the options:
|
<F1> |
For the next cost item for this job |
|
<SF1> |
For the previous cost item |
|
Format |
999 Subjob number. If the job does not use subjobs, this segment is set to zero automatically. |
|
|
999 Change order number. If this cost item is not part of a change order, leave this field blank. If you have chosen (in J/C Control information) not to use change orders, this segment is not present at all. |
|
Example |
No example is given because you are not using Job Cost. |
Upon selection of a valid cost item, the description and cost type of its category display at the bottom of the screen, as well as the title of its sub-job if any.
If the cost item is not a direct cost, an error message is issued.
You are warned if you attempt to distribute a line item to a cost type defined as Labor.
Acct-#
Enter the G/L account number for this cost item, or press <F1> for the default value from the cost item record.
|
Format |
Your standard account number format, defined in Company information |
|
Example |
No example is given because you are not using Job Cost. |
Quantity/Percent/Amount
You can distribute the line by quantity, by percent, or by dollar amount. Initially you are asked for quantity.
Press <F2> to change quantity to percent, then to dollar amount, then back to quantity. This option is only available on the first distribution for the item, and whatever method is chosen here must be used for all the remaining distributions for this line item.
| • | If you enter by quantity, the total quantity for all distributions must equal the item quantity |
| • | If you enter by percent, the total of all distributions must equal 100%. The amount corresponding to each percent is internally calculated; any roundoff amount is assigned to the last distribution entered. |
| • | If you enter by amount, the total amount for all distributions must equal the item extended cost. |
Enter a quantity, amount, or percent; or use one of the options:
Press <F1> to default to the quantity, percent or dollar amount remaining to distribute.
|
Example |
Press <F1> |
Any change ?
After each distribution is entered, you are asked Any change ?. If you answer Y, you can change the quantity/amount/percent. If you enter a value of zero, the distribution is deleted.
You cannot directly change the job or cost item of an existing distribution; however you can delete it by entering zero, then re-enter that distribution as a separate entry under a different account number.
This option gives you a list of purchase orders entered but not yet posted. You should use this list to verify that they are correct before you print and post them to the permanent Purchase Order data.
See a sample Purchase Order Edit List in the Sample Reports appendix.
Select
Edit list from the Purchase orders menu.
The following screen appears:
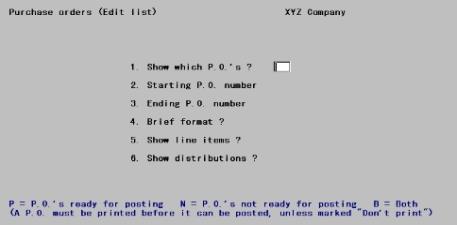
1. Show which P.O.’s ?
This field allows you to limit the report either to only purchase orders that are ready for posting, or to purchase orders that are not yet ready for posting. (Refer to Posting Errors section at the end of this chapter for a description of what makes a purchase order ready for posting.) It can also be used to print a list of all the new (unposted) purchase orders.
Options
Enter P, N, or B.
|
P |
Purchase orders ready for Posting |
|
|
Type P to print only purchase orders ready for posting. Use this option to verify the accuracy of purchase orders before posting. This list will include purchase orders that have been printed and those with a confirming order status of D (Don’t print). |
|
N |
Purchase orders not ready for posting |
|
|
Include only purchase orders that are not ready for posting. This edit list can be used to see what needs to be done to complete and correct these purchase orders so that they can be posted. |
|
|
Since a purchase order is not ready for posting until it has been printed, the list will include purchase orders that haven’t yet been printed (except those having a confirming order status of D for Don’t print). It will also include purchase orders that have been printed, changed, and not reprinted. |
|
B |
Both types (ready and not ready for posting) |
|
|
This will provide you with a complete list of all of your unposted purchase orders, regardless of their status. |
|
Format |
One letter from the list above |
|
Example |
Type: B |
2. Starting P.O. number and
3. Ending P.O. number
Enter the range of purchase orders to show on the edit list. Follow the screen instructions.
|
Format |
15 characters for each field |
|
Example |
Press <F2> at both fields for First through Last |
4. Brief format ?
Answer Y to have the edit list show only the first line of the purchase order header information and a single line for each line item. Answer N for full format, showing all header and line information.
|
Format |
One letter, either Y or N. The default is N. |
|
Example |
Press <Enter> for N |
5. Show line items ?
Answer N to show only the header information for each purchase order, or Y to show the line items and their notes.
|
Format |
One letter, either Y or N. The default is Y. |
|
Example |
Press <Enter> for Y |
6. Show distributions ?
If you specified brief format or did not ask to show line items, this field is forced to N and may not be changed.
Answer N to suppress the line item distributions (both account and job distributions), or Y to show them.
|
Format |
One letter, either Y or N. The default is Y. |
|
Format |
Press <Enter> for Y |
Field number to change ?
Make any needed changes. Upon pressing <Enter> with this field blank, the Purchase Order Edit List will be printed.
Every new purchase order must be printed before posting unless it has a confirming order status of Don't print. If a purchase order is changed after it is printed, it must be printed again before it can be posted.
Your purchase orders will be printed on either plain paper or preprinted forms, depending on what you specified in Control information.
Select
Print new P.O.’s from the Purchase orders menu.
The following screen appears:
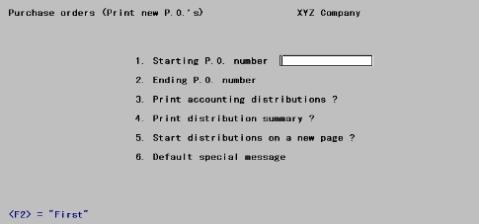
Enter information as follows:
1. Starting P.O. number and
2. Ending P.O. number
Enter the range of purchase orders to print. Follow the screen instructions.
|
Format |
15 characters for each field |
|
Example |
Press <F2> at both fields for First through Last. |
3. Print accounting distributions ?
Press <Enter> to print the distributions. Answer N to print the purchase orders without the distributions. (The distributions are useful to your accounting department, but of no interest to your vendors.)
|
Format |
One letter, either Y or N. The default is Y. |
|
Example |
Press <Enter> |
4. Print distribution summary ?
Press <Enter> to print a summary of the distributions whether or not the distributions for each line item are printed.
|
Format |
One letter, either Y or N. The default is Y. |
|
Format |
Press <Enter> |
5. Start distributions on new page ?
Press <Enter> to print the distributions for each purchase order on a page separate from the line items. Answer N to start the distributions immediately after the line items.
If you print the distributions on a separate page, you can send the vendor a copy of the purchase order without the distributions shown, and send a copy with distributions to your accounting department.
If you answered N in field 3 and 4 above, you are not asked this question.
|
Format |
One letter, either Y or N. The default is Y. |
|
Format |
Press <Enter> for Y |
6. Default special message
This message is optional; if entered, it will print at the bottom of every purchase order that does not have a special message of its own. If you have already entered a special message for a purchase order while entering the purchase order header information, that message will print, not this default special message.
Enter a message number of a message entered in P.O. Messages or press <Enter> to enter up to three lines of text.
|
Format |
Up to three lines of 50 characters each |
|
Example |
Press <Enter> three times for no default special message. |
Field number to change ?
Make any needed changes. Upon pressing <Enter> with this field blank, the printer selection windows will display.
Mounting Forms
Verify that the purchase order forms are mounted on your printer. Mounting forms are not needed if you are merging a graphical file with the data. You may skip the mounting if you are using a Company information PDF printer or Windows printer and the form is set up in Control information. See the Purchase Order Control Information chapter.
PDF Purchase Order Generation
When you print the purchase order with a Company information -PDF- printer, the program generates a PDF file for each new purchase order in the PDFFIL\PURCHASEORDERS directory. The name of each file will momentarily display on the screen as it is being created. An example of the P/O PDF file name is xx_PON_100_001113.PDF. The xx indicates the company number. The PON means it is a new purchase order. The ‘100’ is the vendor number and the ‘001113’ is the purchase order number.
You may also print and generate PDF files simultaneously using a -PDFP- printer.
Viewing and Emailing Purchase Orders
Because many files could be generated, they will not display during the print selection process. However, you may view the generated PDF files from the CTL menu selection Email/view printed PDF's, located under the main menu selection PDF form file processing by using either Adobe™ Acrobat™ and Adobe Reader™. From that same menu selection you may also email PDF files. For user information on using the PDF form file processing features, see the PDF Form File Processing chapter in the System documentation.
To setup emailing see the appendix Email Configuration in the PBS Administration documentation.
Alignment
If you elected to not use a pre-printed P.O. as determined in Control information, the alignment screen will display next.
Enter the up/down and left/right adjustment as needed. If you selected a Windows printer the Windows printer alignment screen displays. If an alignment change is needed, enter a number greater than the Default top margin or the Default left margin. When finished select <Enter> to print the purchase orders.
If you are using a PDF printer, the alignment will display. The alignment file is created in the PDFFIL\ALIGNMENTS directory.
Number of Copies
The screen to enter the number of copies and an option to enter a label for each purchase now displays. Make changes as needed. When finished select <Enter> to continue and the purchase orders will now print.
Posting a new purchase order transfers all of the information about it from the (temporary) transaction data to the permanent Purchase Order master data.
After posting, you will still be able to change and reprint a posted purchase order through the Changes to P.O.’s selection. But posting a purchase order normally means that you have finished composing the purchase order and it is ready to serve its purpose. Posting a purchase order indicates that you are filing it in the permanent master data for future reference.
| • | Purchase order headers are posted to the Purchase Order Headers Master. |
| • | Purchase order lines are posted to the Purchase Order Line Items Master. |
| • | Purchase order distributions are posted to the Purchase Order Distributions Master. |
If I/C is interfaced and the purchase order line is for inventory, the quantity on order is updated in I/C Items.
See a sample Purchase Order Register in the Sample Reports appendix.
Select
Post from the Purchase orders menu.
The following screen appears:

Enter information as follows:
Starting and Ending P.O. # to post
You can post only a portion of the new purchase orders if you wish. Enter the starting and ending number, or press <F2> for the last new purchase order.
|
Format |
15 characters |
|
Example |
Press <F2> at each field. |
Any change ?
Type Y to change your selection or N to continue. Follow the screen instructions to print the Purchase Order Register.
A running display of the current purchase order being posted appears on the screen.
If there are no errors, the new purchase orders are posted to the permanent files.
|
Format |
One letter, either Y or N. |
|
Example |
Type: N |
If the software detects any errors, no posting will occur at this time—not just for the purchase orders in error, but for all of them. The types of errors that the software can detect are:
|
Error |
Description |
|
One or More New Purchase Orders Must Be Printed First. |
Unless you have specified a purchase order as Don't print, a new purchase order must be printed before it can be posted. To handle this situation, return to the Print new P.O.’s function and print all unprinted purchase orders, or change the Is this a confirming order ? field to Don't print. |
|
One or More Items Are Not Stored at a Specific Location |
This can only occur if I/C is interfaced with P/O. The software verifies that each item for Inventory use is in fact stocked at the deliver-to location specified. This requirement does not apply to items for Job or Other use. Either stock the item at the specified location (via I/C Items), delete the line item from the purchase order, or change its use or its deliver-to location. |
|
One or More Purchase Orders Have No Line Items. |
This would be a purchase order for which only a header has been entered. Add line items as appropriate, or delete the purchase order. |